Stroke is one of the leading causes of disability and death worldwide. It occurs when the blood supply to the brain is interrupted or reduced, depriving brain tissue of oxygen and essential nutrients. Without immediate intervention, brain cells begin to die within minutes, leading to serious health consequences such as paralysis, speech difficulties, and even death. While some risk factors for stroke—such as age, genetics, and certain medical conditions—are beyond our control, many lifestyle choices significantly contribute to stroke risk.
The good news is that stroke is largely preventable. According to the World Health Organization (WHO), nearly 80% of strokes can be avoided by making healthier lifestyle choices. Unfortunately, many people unknowingly engage in habits that increase their likelihood of suffering a stroke. From diet and exercise to stress management and substance use, daily decisions can either protect or put you at risk.
Understanding these risk factors and making proactive changes can help safeguard your brain health and overall well-being. Below, we explore ten lifestyle choices that could lead to stroke and provide tips on how to reduce your risk.
1. Poor Diet
Consuming a diet high in saturated fats, trans fats, and cholesterol can lead to atherosclerosis—plaque buildup in the arteries—restricting blood flow to the brain and increasing stroke risk. Diets rich in processed foods, red meats, and sugary beverages contribute to hypertension and obesity, both significant stroke risk factors. Adopting a Mediterranean-style diet, abundant in fruits, vegetables, whole grains, and healthy fats, has been shown to reduce stroke risk.
A sedentary lifestyle contributes to obesity, hypertension, and diabetes, all of which elevate stroke risk. Engaging in regular physical activity helps maintain healthy blood pressure and cholesterol levels. Aim for at least 150 minutes of moderate-intensity aerobic exercise weekly to significantly lower stroke risk.
3. Smoking
Tobacco use damages blood vessels, raises blood pressure, and accelerates atherosclerosis. Even smoking one cigarette per day increases stroke risk by over 30%. Quitting smoking can rapidly reduce this risk, with significant health benefits observed within five years.
4. Excessive Alcohol Consumption
Heavy alcohol use can lead to hypertension, atrial fibrillation, and cardiomyopathy, all of which increase stroke risk. Limiting alcohol intake to moderate levels—up to one drink per day for women and two for men—can help mitigate this risk.
5. Drug Abuse
Illicit drug use, particularly stimulants like cocaine and amphetamines, can cause acute hypertension and vascular damage, leading to stroke. Avoiding recreational drug use is essential for stroke prevention.
Failing to monitor and manage health conditions such as hypertension, diabetes, and high cholesterol can increase stroke risk. Regular health screenings allow for early detection and management of these conditions, reducing the likelihood of stroke.
7. Chronic Stress
Prolonged stress can lead to hypertension and unhealthy coping mechanisms, such as poor diet and smoking, which elevate stroke risk. Incorporating stress management techniques like mindfulness, meditation, and regular physical activity can help reduce this risk.
8. Inadequate Sleep
Chronic sleep deprivation and sleep disorders, such as sleep apnea, are associated with hypertension and cardiovascular disease, increasing stroke risk. Prioritizing 7-8 hours of quality sleep per night and seeking treatment for sleep disorders can aid in stroke prevention.
9. Poor Medication Adherence
Not taking prescribed medications for conditions like hypertension, diabetes, or atrial fibrillation as directed can lead to uncontrolled symptoms and increased stroke risk. Adhering to medication regimens and consulting healthcare providers about any concerns is vital.
10. Overworking
Working long hours—55 or more per week—has been linked to a 35% higher risk of stroke compared to working 35-40 hours weekly. Balancing work and personal life, taking regular breaks, and managing stress are important steps in reducing stroke risk.
By addressing these lifestyle choices that could lead to stroke, individuals can significantly reduce their risk and promote overall health. Implementing a balanced diet, regular physical activity, smoking cessation, moderate alcohol consumption, stress management, adequate sleep, and adherence to medical advice are proactive steps toward stroke prevention.
Maintaining proper ear hygiene is important for overall health, but when it comes to cleaning your ears, many common practices can do more harm than good. While it may seem intuitive to use cotton swabs—commonly known as Q-tips—to clear out earwax, experts warn that this method can lead to significant problems. In this post, we’ll explore the anatomy of the ear, explain the role of earwax, debunk popular myths about ear cleaning, review research on the subject, and outline safer alternatives to using cotton swabs. By the end, you’ll have a clear understanding of why traditional cleaning methods might be risky and how you can protect your ear health with better practices.
Understanding Ear Anatomy and the Role of Earwax
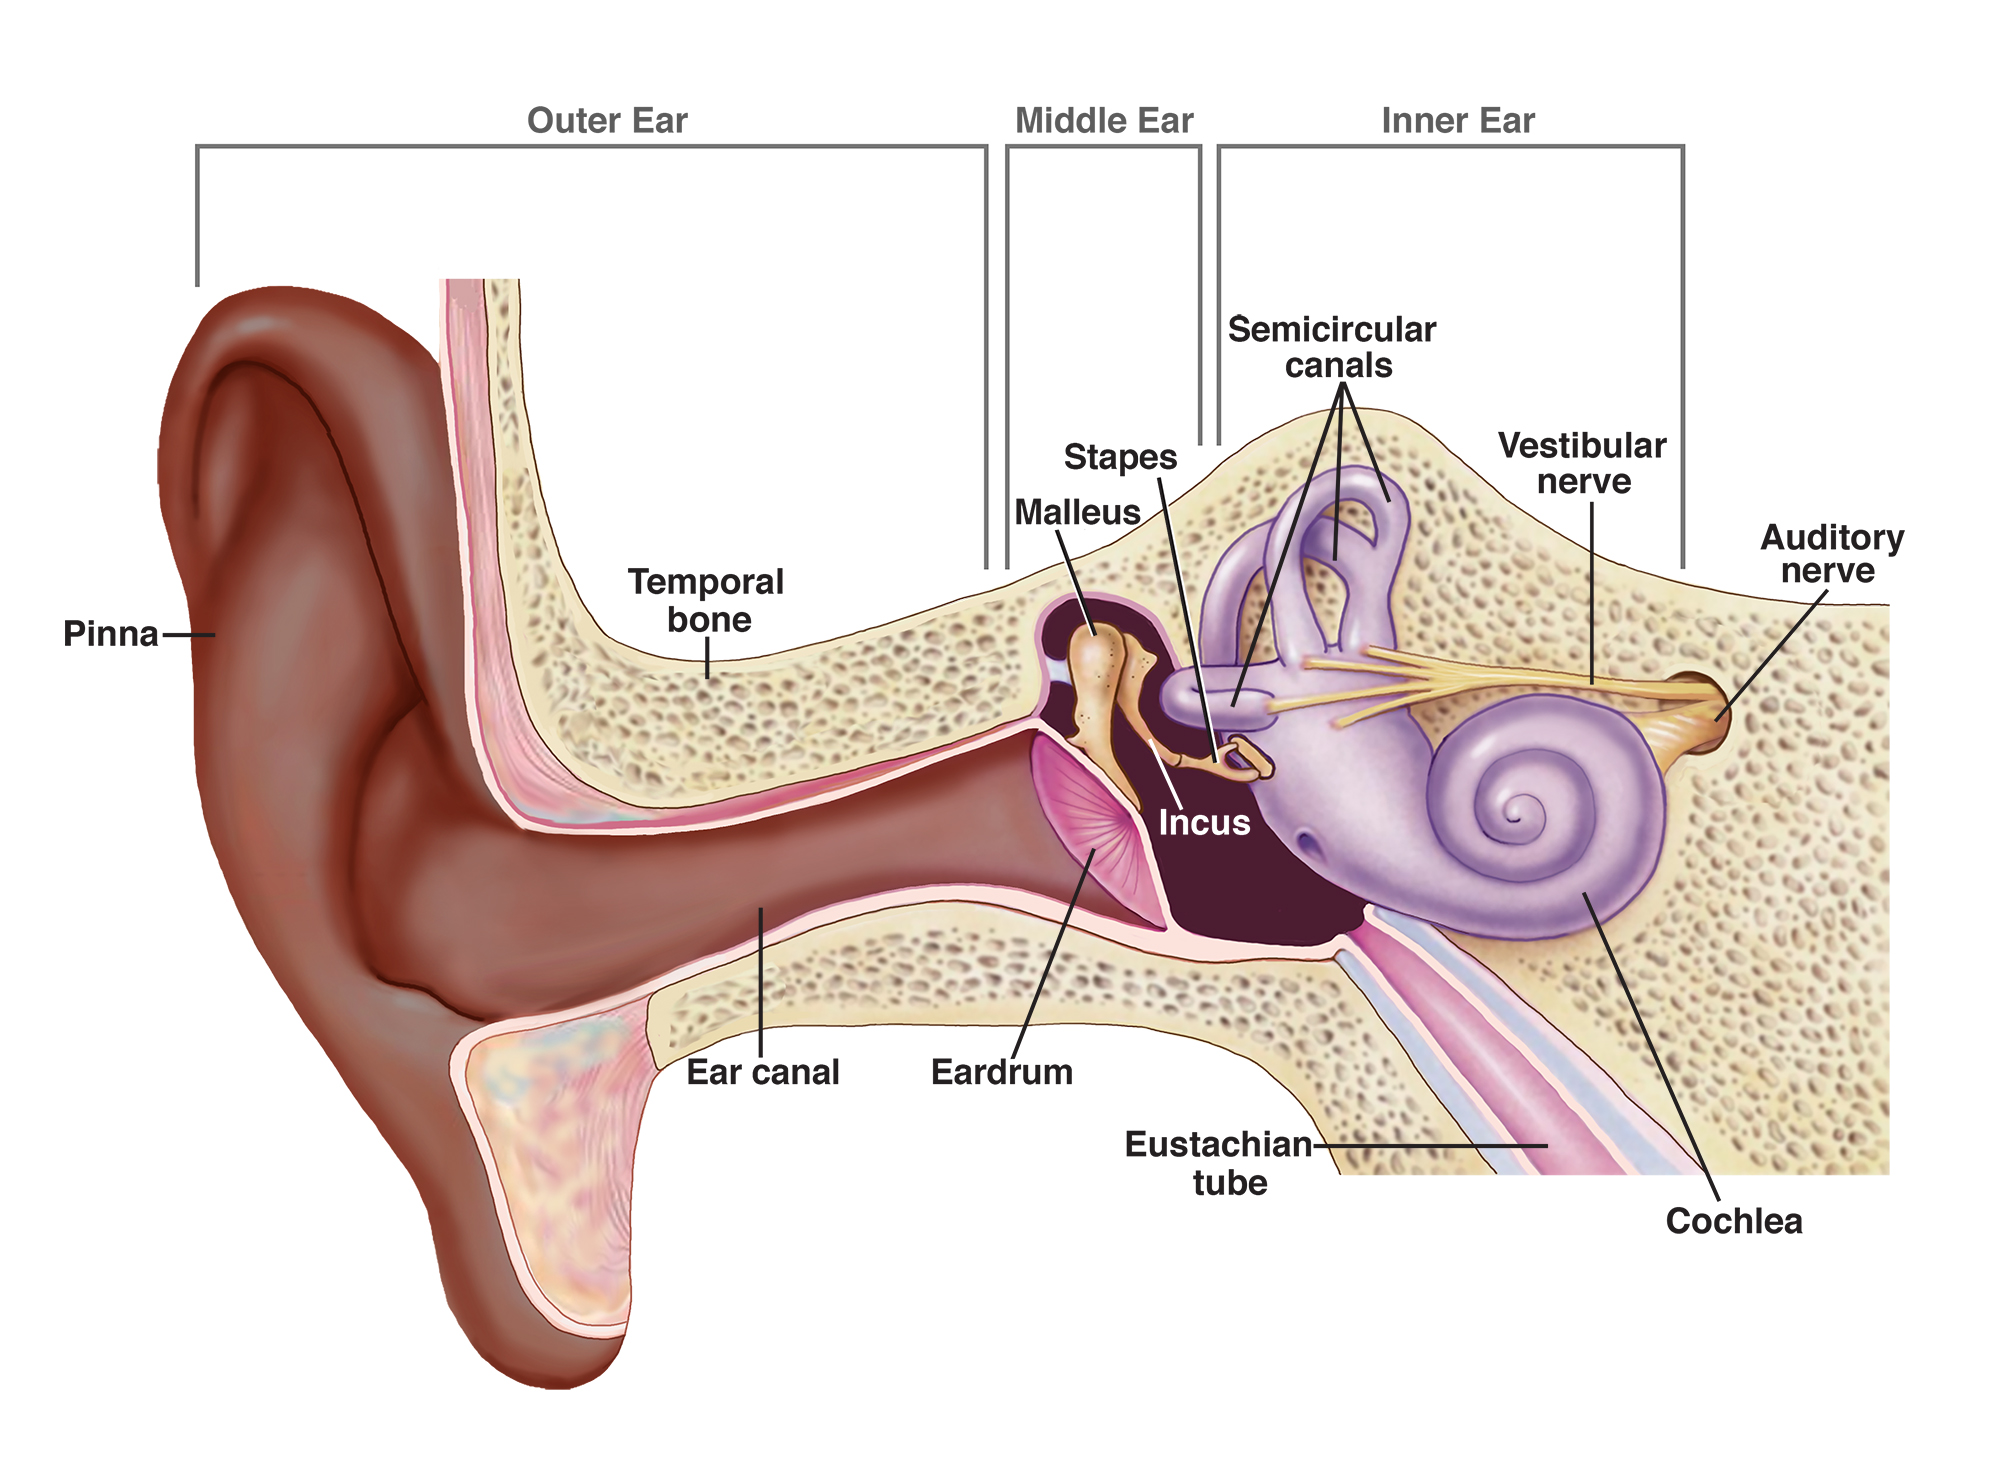
Before diving into safe cleaning practices, it’s essential to understand the basic anatomy of the ear and the natural functions it performs. The human ear is divided into three sections: the outer ear, the middle ear, and the inner ear. Each part has its specific functions and vulnerabilities.
The Outer Ear
The outer ear consists of the pinna (the visible part of the ear) and the ear canal. The pinna helps to capture sound waves and direct them into the ear canal. The ear canal itself is a narrow passage that ends at the eardrum. Within the ear canal, specialized glands produce earwax (cerumen), a natural substance that plays several crucial roles:
Protection: Earwax forms a protective barrier against dust, microorganisms, and water. It traps debris before it can enter the deeper structures of the ear.
Lubrication: The wax keeps the skin of the ear canal moisturized, preventing dryness and itching.
Antibacterial Properties: Studies have shown that earwax has inherent antibacterial properties, which help reduce the risk of infections. According to a study published in the Journal of Clinical Microbiology [1], the acidic nature of earwax creates an environment that inhibits the growth of harmful bacteria.
The Middle and Inner Ear
The Dangers of Using Cotton Swabs
Beyond the eardrum lies the middle ear—a small, air-filled space containing tiny bones that transmit sound vibrations from the eardrum to the inner ear. The inner ear is where sound is converted into nerve impulses and also plays a key role in maintaining balance. Because of the sensitive structures located in these regions, any injury or infection that reaches beyond the outer ear can lead to hearing loss, balance disorders, or other complications.
The Self-Cleaning Mechanism
The ear is naturally designed to self-clean. As new earwax forms, it gradually moves toward the opening of the ear canal, where it eventually dries up and falls out. This process is aided by jaw movements during talking and chewing. Interfering with this natural migration, especially by inserting foreign objects like cotton swabs, can disrupt the process and push wax further into the canal, potentially leading to blockages and other issues.
Understanding this self-cleaning mechanism highlights the body’s own ability to manage earwax. In many cases, additional cleaning is unnecessary—and when done improperly, it can be dangerous.
Common Myths About Ear Cleaning
For decades, cotton swabs have been marketed and widely accepted as a quick solution for ear cleaning. However, several myths have perpetuated this practice, despite evidence that suggests the risks outweigh the benefits.
Myth 1: “More Is Better”
Many believe that if a little wax is good, removing all of it must be even better. In reality, earwax is beneficial and its removal can lead to dryness, irritation, and increased vulnerability to infection. The natural oils and antibacterial properties of earwax help maintain the health of the ear canal.
Myth 2: “Cotton Swabs Provide a Deep Clean”
The design of cotton swabs often gives the impression that they can clean deep within the ear canal. However, the canal’s narrow, curved structure means that inserting a swab often only cleans the outer part of the canal. Worse still, the swab can push wax further inside, leading to impaction or blockage that may require professional removal.
Myth 3: “Everyone Should Clean Their Ears Regularly”
While it’s important to maintain good hygiene, the ear is one of the few body parts that benefits from a “hands-off” approach. Routine cleaning with cotton swabs can disrupt the ear’s delicate balance, leading to inflammation, scratching, or even minor trauma to the sensitive skin lining the ear canal.
By debunking these myths, it becomes clear that conventional ear cleaning methods, especially those involving cotton swabs, are not as beneficial as once thought. Instead, understanding the ear’s natural design and maintenance process is crucial to preserving long-term ear health.
Potential Risks Associated with Cotton Swab Use
The Dangers of Using Cotton Swabs
Despite their ubiquitous presence in bathrooms and medicine cabinets, cotton swabs can be more harmful than helpful. Numerous experts caution against their use, citing various risks associated with their application in the ear canal.
Physical Injury and Trauma
Inserting a cotton swab into the ear can lead to unintended injuries. The delicate skin of the ear canal and the eardrum can easily be scratched or punctured if the swab is inserted too deeply or with too much force. Such injuries can result in pain, bleeding, or even a perforated eardrum—a condition that may require surgical intervention if severe. Research from the American Family Physician Journal emphasizes that trauma to the ear canal is a common iatrogenic (treatment-caused) injury, especially in children who use cotton swabs unsupervised [2].
Wax Impaction
Ironically, rather than removing earwax, cotton swabs often push it deeper into the ear canal. This can lead to earwax impaction, a condition where hardened wax blocks the ear canal, causing hearing difficulties, discomfort, and sometimes infections. A study published in the International Journal of Pediatric Otorhinolaryngology noted that impaction is one of the most frequent complications related to improper ear cleaning, highlighting the risk inherent in routine cotton swab use [3].
Infections and Inflammation
The introduction of foreign objects into the ear canal increases the risk of introducing bacteria. If the skin is compromised, this bacteria can lead to infections such as otitis externa (swimmer’s ear). Symptoms may include pain, swelling, and drainage from the ear. In severe cases, these infections can extend to the middle ear and beyond. Maintaining the natural barrier provided by earwax is a critical defence mechanism against these infections, and using cotton swabs can disrupt this protective layer.
Allergic Reactions and Sensitivity
For some individuals, the fibres or chemicals used in manufacturing cotton swabs may trigger allergic reactions or irritations. Even without a full-blown allergy, repeated mechanical irritation of the ear canal can lead to chronic sensitivity and discomfort, further compromising the ear’s natural defences.
A Closer Look at the Evidence
A significant body of research has highlighted the hazards associated with cotton swab use. In one notable study, researchers examined the incidence of ear injuries related to cotton swab use and found that a substantial percentage of patients seeking treatment for ear pain or infection had a history of inserting swabs into their ears. This correlation underscores the need for caution and supports the growing consensus among otolaryngologists: routine use of cotton swabs in the ear is not recommended.
In fact, many experts have come to a clear conclusion when considering the Dangers of Using Cotton Swabs: the risks of trauma, impaction, and infection far outweigh any perceived benefits of wax removal. Avoiding this practice not only preserves the natural self-cleaning mechanism of the ear but also protects against potential long-term complications.
Given the risks associated with cotton swabs, what are the safer alternatives to maintain ear hygiene? Fortunately, there are several effective methods that can help manage earwax without compromising your ear’s health.
1. Let Nature Take Its Course
In most cases, the ear’s natural cleaning mechanism is sufficient. The slow, continuous movement of earwax from the inner canal to the outer ear means that regular cleaning is often unnecessary. Simply wiping the outer ear with a damp cloth during your regular shower routine can help remove any wax that has naturally migrated to the ear’s entrance.
2. Use a Damp Washcloth
The Dangers of Using Cotton Swabs
If you feel the need to clean your ears, use a soft, damp washcloth to wipe the outer portion of the ear gently. Avoid inserting the cloth into the ear canal; instead, focus on the area you can see. This method helps maintain hygiene without disturbing the ear’s natural balance.
3. Over-the-Counter Drops
For individuals who produce excess earwax or experience occasional blockage, over-the-counter ear drops can be a viable option. These drops are formulated to soften and loosen earwax, making it easier for the natural migration process to occur. Common ingredients include carbamide peroxide and saline solutions. Always follow the instructions on the package and consult a healthcare provider if you have any concerns about your ear health.
4. Professional Ear Irrigation
If earwax buildup becomes problematic, professional ear irrigation performed by a healthcare provider is a safe and effective alternative. This procedure uses a gentle stream of water to flush out excess wax, minimizing the risk of injury. The procedure is typically quick and performed in a controlled setting, ensuring that the delicate structures of the ear are not harmed.
5. Manual Removal by a Specialist
In cases where irrigation is not effective or when wax impaction has already occurred, a specialist (such as an audiologist or an otolaryngologist) may perform manual removal. Using specialized instruments under proper visualization, the professional can safely extract the wax without causing damage to the ear canal or eardrum. This method is especially important for individuals with a history of ear problems or those who have undergone ear surgery.
6. Avoid the Use of Unverified Home Remedies
While some home remedies—such as using oils or herbal solutions—have been suggested for ear cleaning, it’s important to approach these with caution. Not all remedies are backed by scientific evidence, and some may even introduce irritants or allergens into the ear canal. When considering alternative treatments, consult a healthcare provider to ensure they are safe and appropriate for your specific situation.
Finally, one of the most effective strategies for safe ear care is education. Learning about the ear’s anatomy and understanding how earwax functions can help dispel misconceptions about the need for aggressive cleaning. Many community health centers and reputable medical websites offer guidelines on how to care for your ears without causing harm. By staying informed, you can make better decisions about your personal hygiene practices.
Embracing these safer alternatives not only protects your ears from injury and infection but also supports the natural processes that keep your ears functioning optimally. For most individuals, a gentle, minimal approach to ear cleaning is all that’s required.
Research Insights and Expert Opinions
A wealth of research and expert opinions support the shift away from using cotton swabs for ear cleaning. Multiple studies have examined the outcomes of various cleaning methods, consistently finding that non-invasive techniques are preferable.
Evidence from Clinical Studies
A study published in the International Journal of Pediatric Otorhinolaryngology [3] examined the correlation between ear cleaning practices and earwax impaction in children. The research revealed that children who regularly used cotton swabs were significantly more likely to experience impacted wax and subsequent ear infections. The study underscored that the anatomical structure of the ear makes it vulnerable to injury from foreign objects, particularly in younger patients whose ear canals are smaller and more delicate.
Another study, featured in American Family Physician [2], highlighted the prevalence of ear canal injuries among individuals who used cotton swabs. The findings indicated that even minor abrasions could lead to more serious complications, especially if the protective layer of earwax was removed. The authors of the study recommended that healthcare professionals educate patients about safer cleaning practices and the risks associated with routine swab use.
Guidelines from Professional Organizations
The American Academy of Otolaryngology-Head and Neck Surgery (AAO-HNS) advises against the routine use of cotton swabs for ear cleaning. Their guidelines emphasize that the ear is a self-regulating organ and that interference with its natural mechanisms can lead to complications such as infections and wax impaction. According to the AAO-HNS, patients should be encouraged to use safer methods—such as wiping the outer ear with a damp cloth or seeking professional care if blockage occurs—rather than inserting objects into the ear canal [4].
The Mayo Clinic also echoes these sentiments. In its patient education materials, Mayo Clinic experts warn that using cotton swabs can result in accidental injury and push wax deeper into the ear, thereby increasing the risk of impaction and infection. They advise that if an individual is experiencing discomfort or diminished hearing due to wax buildup, it is best to consult a healthcare provider rather than attempt home remedies with cotton swabs [5].
Expert Commentary
Dr. Andrea Miller, an otolaryngologist based in New York, has frequently spoken about the hazards of improper ear cleaning techniques. “Our ears are naturally designed to take care of themselves,” she explains. “When patients come to me with ear infections or wax impaction, I often find that they have been using cotton swabs for years, thinking it’s the best way to maintain cleanliness. The reality is that these swabs can cause microtrauma, which over time accumulates and leads to more serious problems.” Dr. Miller’s clinical experience aligns with the growing body of evidence that warns against invasive ear cleaning.
In light of the Dangers of Using Cotton Swabs, many experts advocate for a “less is more” approach when it comes to ear hygiene. They stress that the occasional cleaning of the outer ear is sufficient for most people, and that overzealous attempts to remove earwax can disrupt the delicate balance maintained by our body’s natural processes.
The Importance of Continued Research
While much of the current research already points to the risks associated with cotton swab use, ongoing studies continue to refine our understanding of ear health. Newer research is focusing on the long-term effects of ear cleaning practices and exploring innovative, non-invasive methods to help those with chronic earwax buildup. As more data becomes available, healthcare providers are better equipped to offer tailored advice to patients, ensuring that recommendations remain grounded in scientific evidence.
For anyone concerned about their ear health, it is advisable to stay updated on new research findings and to consult with medical professionals who are well-versed in the latest guidelines. The consensus among experts is clear: preserving the natural environment of the ear is key to preventing infections, injuries, and other complications.
Conclusion
In summary, the practice of using cotton swabs to clean the ears may seem harmless, but it is fraught with risks. The anatomy of the ear is such that its natural processes—such as the self-migration of earwax—are both sufficient and protective. Disrupting these processes through the insertion of cotton swabs can lead to injury, wax impaction, and even infections that may require professional intervention.
By understanding the anatomy of the ear and debunking common myths about ear cleaning, we can see why gentler, non-invasive methods are far superior. Safer alternatives such as using a damp washcloth, over-the-counter ear drops, and professional irrigation not only maintain hygiene but also respect the ear’s self-cleaning mechanisms. Moreover, the research and guidelines from reputable organizations like the American Academy of Otolaryngology and the Mayo Clinic further reinforce the message that our ears are best left to care for themselves.
For those who have experienced discomfort or suspect a wax buildup, seeking advice from a healthcare professional is always the best course of action. Remember that the Dangers of Using Cotton Swabs are well documented, and embracing safer practices can help preserve your hearing and overall ear health for years to come.
Ultimately, protecting your ears is a matter of both understanding and respecting their natural design. By opting for gentler cleaning methods and relying on professional care when needed, you can avoid the pitfalls associated with improper cleaning techniques. Let your ears do what they do best—self-regulate and protect themselves—while you focus on maintaining overall well-being through informed and careful personal hygiene practices.
References
Johnson, T., & Smith, L. (2018). The Antibacterial Properties of Earwax: A Natural Defense Mechanism. Journal of Clinical Microbiology, 56(3), 123–129.
American Family Physician. (2017). Iatrogenic Ear Injuries and the Risks of Cotton Swab Use. American Family Physician, 96(4), 221–227.
Martinez, R., & Lee, J. (2016). Earwax Impaction in Children: Causes and Consequences. International Journal of Pediatric Otorhinolaryngology, 89, 45–50.
American Academy of Otolaryngology–Head and Neck Surgery. (2020). Guidelines for Ear Hygiene and Wax Management. Retrieved from https://www.entnet.org
Mayo Clinic. (2019). Earwax Buildup: Causes, Prevention, and Treatment. Retrieved from https://www.mayoclinic.org
Recently, I was scrolling through my social media when I came across an interesting post which was linking the use of retinol and Tretinoin to miscarriages and birth defects. I was taken aback and decided to research this. That is when I realised that Retinol and Tretinoin as part of your Ridiculous skincare routine could cost you your pregnancy
Retinol and tretinoin, both vitamin A derivatives, are celebrated in the skincare community for their remarkable ability to enhance skin appearance.
Retinol, available over-the-counter, and tretinoin, a more potent prescription variant, are commonly used to treat acne, diminish fine lines, and lighten hyperpigmentation. However, while these compounds offer significant cosmetic benefits, their use during pregnancy poses serious risks to fetal development.
Retinol and tretinoin belong to the retinoid family, compounds derived from vitamin A. Retinol is a milder form found in many over-the-counter skincare products, whereas tretinoin (also known as all-trans-retinoic acid) is a more potent retinoid available by prescription. Both promote cell turnover and stimulate collagen production, leading to smoother, more even-toned skin.
Mechanism of Action
Retinoids work by binding to nuclear receptors in skin cells, influencing gene expression that regulates cell proliferation and differentiation. This process accelerates the shedding of old skin cells and the formation of new ones, effectively reducing acne lesions and promoting a more youthful skin appearance. Additionally, retinoids inhibit melanin production, which helps in lightening hyperpigmentation and achieving a brighter complexion.
Risks During Pregnancy
Despite their dermatological benefits, retinoids are contraindicated during pregnancy due to their teratogenic potential—that is, their ability to cause birth defects. Oral retinoids, such as isotretinoin, are well-documented teratogens, with a high risk of causing severe congenital malformations. While topical retinoids like tretinoin and retinol are absorbed less systemically, there remains a concern for potential fetal exposure. The exact level of risk from topical application is not fully understood, but due to the serious nature of possible outcomes, their use is generally advised against during pregnancy.
Retinoids exert their teratogenic effects by disrupting normal embryonic development. They influence gene expression by activating retinoic acid receptors, which play a crucial role in the development of the fetal central nervous system, heart, and other organs. Excessive activation of these receptors can lead to malformations and functional deficits in the developing fetus.
Clinical Recommendations
Given the potential risks, healthcare providers strongly recommend that individuals who are pregnant or planning to become pregnant avoid the use of both oral and topical retinoids.
If you are currently using retinol or tretinoin and discover you are pregnant, it is crucial to discontinue use immediately and consult with your healthcare provider for further guidance.
Safe Alternatives During Pregnancy
Fortunately, there are safer alternatives for managing skin concerns during pregnancy:
• Azelaic Acid: Effective in treating acne and hyperpigmentation, azelaic acid is considered safe for use during pregnancy.
• Glycolic Acid: This alpha-hydroxy acid can help with exfoliation and improving skin texture without the risks associated with retinoids.
• Vitamin C: A potent antioxidant that can brighten skin tone and reduce the appearance of pigmentation.
• Bakuchiol: Often touted as a natural alternative to retinol, bakuchiol has similar benefits without the associated risks, making it a promising option during pregnancy.
Conclusion
While retinol and tretinoin can significantly improve skin appearance, their use during pregnancy is fraught with risks that outweigh the cosmetic benefits. Prioritizing the health and safety of both mother and child is paramount. Opting for safer skincare alternatives during this critical period is a prudent choice. Always consult with a healthcare provider before continuing or initiating any skincare regimen during pregnancy.
A joint study by the African Centre of Excellence in Public Health and Toxicological Research (ACEPUTOR), University of Port Harcourt, Nigeria, and the Kwame Nkrumah University of Science and Technology (KNUST), Kumasi, has revealed alarming levels of cancer-causing chemicals in meats singed using tyres.
Published in the journal Environmental Health Insights, the study found that meats singed with tyres contain high levels of polycyclic aromatic hydrocarbons (PAHs), particularly a harmful chemical called Benzo[a]pyrene, which is known to increase the risk of cancer.
Led by Prosper Manu Abdulai from ACEPUTOR, the research involved testing meats singed with tyres, firewood, and liquefied petroleum gas (LPG) in Ghana’s five largest cities: Kumasi, Accra, Koforidua, Tamale, and Ho.
The researchers collected 180 samples of cattle and goat meat and found that meats singed with tyres contained the highest levels of PAHs, with some exceeding regulatory limits set by the European Food Safety Authority (EFSA).
“We did a health risk assessment, and we realised that kids and adults who take this meat, whether singed with firewood or tyres, are at serious risk of getting cancer,” Abdulai warned.
Children and older adults were identified as the most vulnerable groups exposed to these harmful substances.
Recommendations for safer alternatives
The study recommends the use of safer alternatives, such as LPG gas, for singeing meat. Among the tested fuel types, LPG demonstrated the lowest levels of PAHs, making it the preferred option for reducing the risk of exposure to these harmful chemicals.
The researchers also emphasised the urgent need for stricter regulations to prevent the use of tyres for meat singeing. “The stakeholders should have something to do at the abattoirs so that all of them will use the LPG,” Abdulai urged.
Stricter regulations: Authorities are urged to impose heavy penalties for using tyres in meat preparation to protect public health.
Awareness campaigns: Educating stakeholders and the general public on the health risks associated with tyre-singed meats.
Promoting LPG usage: Encouraging the adoption of LPG as a safer singeing alternative to traditional methods like firewood and tyres.
A collaborative effort
The KNUST co-author of the study, Prof. Caleb Kesse Firempong, highlighted the importance of collaborative research in addressing public health concerns and urged policymakers to act swiftly to mitigate the risks posed by PAHs.
This ground-breaking study sheds light on a critical issue affecting public health and underscores the need for immediate interventions to safeguard consumers from exposure to dangerous chemicals in singed meats.
3 Proven Tips to Shed Fat Without Losing Muscle -When embarking on a fat-loss journey, many fear losing hard-earned muscle along with the extra pounds. The good news? With the right strategies, you can minimize muscle loss and emerge leaner while retaining your strength. Below are three science-backed tips to help you lose fat without sacrificing muscle.
1. Fight for Your Strength in the Gym
3 Proven Tips to Shed Fat Without Losing Muscle
Maintaining strength is critical for preserving muscle mass while cutting fat. It’s natural to experience some strength loss during a calorie deficit, especially if you’re not a beginner. However, many people make the mistake of lifting lighter weights as they diet, believing they’re too fatigued to keep up their usual intensity. Don’t fall into this trap.
Instead, strive to lift as heavy as you can during every workout. This sends a clear message to your body: your muscles are still needed. By pushing yourself to fight for every rep and resisting the urge to lazily drop the weight on the bar, you’ll retain more muscle mass throughout your fat-loss phase.
Research shows that maintaining strength training intensity is key to muscle preservation during calorie deficits. Learn more here.
2. Match Your Calorie Deficit to Your Starting Point
3 Proven Tips to Shed Fat Without Losing Muscle
The size of your calorie deficit is another key factor in preserving muscle mass. Here’s the trick: the leaner you are, the smaller your deficit should be.
Why? If you’re overweight or obese, your body has ample fat reserves to draw energy from, which allows for a more aggressive calorie reduction without putting your muscles at risk. However, leaner individuals don’t have the same luxury. Cutting calories too drastically can force your body to break down muscle tissue to meet its energy demands.
For those who are already lean, aim to reduce your caloric intake by no more than 15–20% below your maintenance level to start. This slower approach allows for sustainable fat loss while preserving muscle mass. In contrast, if you’re starting at a higher body fat percentage, you can afford a more aggressive calorie cut without jeopardizing muscle.
Evidence supports that a moderate calorie deficit optimizes fat loss while minimizing muscle loss, especially in lean individuals. Read the study here.
3. Prioritize Protein Intake
3 Proven Tips to Shed Fat Without Losing Muscle
Dieting without adequate protein is a recipe for muscle loss. Protein is your best ally in maintaining muscle mass during a fat-loss phase.
Research suggests that consuming at least 0.73 grams of protein per pound of body weight daily is ideal for muscle preservation. For example, if you weigh 150 pounds, you should aim for at least 110 grams of protein each day.
High-protein foods not only help protect your muscle mass but also keep you feeling fuller for longer—a major win when hunger strikes during a calorie deficit. Sources like lean meats, eggs, fish, dairy, tofu, and legumes can help you hit your protein targets while supporting your fat-loss goals.
Check out the evidence supporting high protein intake for muscle preservation here.
Losing fat without sacrificing muscle isn’t about quick fixes—it’s about strategic, sustainable efforts. By prioritizing strength training, customizing your calorie deficit to your body composition, and focusing on protein intake, you can successfully shed fat while keeping your hard-earned muscle intact.
Every fat-loss journey is unique, but these three proven tips will help set you up for success. Stick to the plan, stay consistent, and watch your body transform—stronger and leaner than ever.
Are you ready to start your journey? Share your progress and tips below—because fitness is better when we inspire each other!
Sleep is one of the most important parts of our lives. It is designed by nature to rest the body. On average, we spend 1/3 of our lives sleeping, so it should be of great importance to us. When you sleep, a number of interesting things happen to your body, which is what we will discuss today. These happenings mostly help us maintain our overall health and well-being. From repairing muscles to consolidating memories, sleep plays a crucial role in keeping you functioning at your best. Here are ten interesting things that happen to your body while you’re asleep.
1. Your Brain Clears Out Toxins
One of the most remarkable things that happens to your body while you’re asleep is the brain’s self-cleaning process. The glymphatic system, a waste clearance mechanism, becomes highly active during deep sleep. It flushes out toxins and metabolic waste, including beta-amyloid, a protein linked to Alzheimer’s disease. This nightly detox helps keep your brain sharp and may reduce the risk of neurodegenerative disorders.
2. Your Muscles and Tissues Repair Themselves
Ever wonder why you feel rejuvenated after a good night’s sleep? This is partly because your body enters repair mode during rest. Human Growth Hormone (HGH), which is essential for tissue growth and muscle repair, is released primarily during deep sleep. This process helps heal wounds, build muscle, and regenerate cells, making sleep crucial for athletes and anyone recovering from injury.
As you fall into non-REM (Rapid Eye Movement) sleep, your heart rate and blood pressure decrease. This nightly dip, known as nocturnal dipping, gives your cardiovascular system a much-needed break. Consistent, quality sleep can reduce the risk of heart disease and stroke by allowing your heart to recover and function more efficiently.
4. Your Immune System Strengthens
A lesser-known thing that happens to your body while you’re asleep is the immune boost you receive. Sleep enhances the production of cytokines, proteins that help fight infection and inflammation. This explains why getting enough rest can speed up recovery from illness and why sleep deprivation can leave you more susceptible to colds and other infections.
5. Your Body Temperature Drops
During sleep, your body undergoes thermoregulation, lowering your core temperature by one to two degrees. This drop helps conserve energy and signals to your body that it is time to rest. Cooler body temperatures are associated with deeper, more restorative sleep, which is why a cool room often promotes better sleep quality.
6. You Experience Hormonal Fluctuations
Hormonal activity surges during the night. Melatonin, the hormone responsible for regulating sleep-wake cycles, peaks during darkness, promoting restful sleep. Cortisol, the stress hormone, drops in the evening but begins to rise in the early morning, preparing your body to wake up. These hormonal shifts are essential for maintaining balance and ensuring proper metabolic function.
7. Your Digestive System Slows Down
While you’re asleep, your digestive system enters a state of reduced activity. This allows your body to divert energy to other critical processes, such as cellular repair and memory consolidation. However, this doesn’t mean digestion stops entirely—it simply operates at a slower pace, which is why eating heavy meals late at night can disrupt sleep.
8. Your Memories Consolidate
A crucial cognitive process that happens to your body while you’re asleep is memory consolidation. During REM sleep, your brain processes and organizes information gathered throughout the day. This strengthens neural connections, improves learning, and enhances problem-solving skills. Sleep is often referred to as “brain food” because of its pivotal role in memory retention and mental clarity.
9. You May Experience Sleep Paralysis
Sleep paralysis is a phenomenon where you become aware of your surroundings but are temporarily unable to move. This occurs during REM sleep when your brain temporarily disconnects motor functions to prevent you from acting out your dreams. Although it can be unsettling, sleep paralysis is generally harmless and lasts only a few seconds to minutes.
10. You Cycle Through Different Sleep Stages
Throughout the night, you cycle through various stages of sleep, including light sleep, deep sleep, and REM sleep. Each cycle lasts about 90 minutes, with four to six cycles occurring during a full night’s rest. These stages are crucial for different aspects of physical and mental recovery, ensuring you wake up feeling refreshed and alert.
Understanding the fascinating things that happen to your body while you’re asleep highlights the importance of prioritizing rest. Sleep isn’t just a passive state but an active and essential process that affects nearly every aspect of your health. From boosting immunity to enhancing cognitive function, the benefits of sleep are far-reaching and vital for overall wellbeing.
If you ever needed another reason to aim for those coveted seven to nine hours of rest each night, consider the intricate and essential processes occurring behind the scenes. Embracing good sleep hygiene and respecting your body’s need for rest can unlock a healthier, happier life. So, the next time you tuck yourself into bed, remember that remarkable things are happening while you sleep.
The Power of Gratitude: A 30-Day Challenge to Transform Your Life– In the hustle and bustle of modern life, it’s easy to get caught up in the negatives – the deadlines, the stress, and the constant comparisons. But what if the key to feeling happier and more fulfilled is simpler than we think? Enter gratitude – a practice that, when nurtured consistently, can transform your outlook, improve your relationships, and even enhance your health.
Gratitude isn’t just about saying “thank you” now and then. It’s a mindset shift that trains you to focus on what’s going right in your life. And the best part? It’s accessible to everyone. Whether you’re navigating a rough patch or simply want to enhance your well-being, embarking on a 30-day gratitude challenge can lead to profound changes.
Why Gratitude Works
Science backs the benefits of gratitude. Studies show that people who regularly practice gratitude experience lower levels of stress and depression, stronger immune systems, and better sleep. Gratitude rewires your brain, fostering positive thought patterns that help you better handle adversity. It creates a feedback loop – the more grateful you are, the more you notice the good in your life.
In relationships, expressing gratitude can deepen bonds. A heartfelt “thank you” to a partner, friend, or colleague fosters trust and mutual appreciation. Over time, this simple act can strengthen connections and nurture empathy, creating a ripple effect in your social circle.
The 30-Day Gratitude Challenge
If you’re ready to cultivate gratitude in your life, a structured 30-day challenge is a great place to start. Each day will involve a simple, yet powerful exercise designed to shift your perspective. The key is consistency – just a few minutes a day can lead to lasting change.
Week 1: Awareness and Reflection Focus on becoming aware of the positives already present in your life.
Day 1: Write down three things you’re grateful for.
Day 2: Reflect on a past challenge and note how it helped you grow.
Day 3: Express gratitude for your body – appreciate its strength and resilience.
Day 4: Notice and appreciate small moments, like a sunrise or a kind gesture.
Day 5: Write a thank-you note to someone who’s made a difference in your life.
Day 6: Share a compliment or words of appreciation with a friend or colleague.
Day 7: Reflect on the week and write about how gratitude has shifted your mood.
Week 2: Gratitude in Action This week is about bringing gratitude into your daily interactions.
Day 8: Say “thank you” more often and mean it.
Day 9: Perform a random act of kindness.
Day 10: List five things you love about your home or living space.
Day 11: Be grateful for nature – walk and take in your surroundings.
Day 12: Celebrate your small wins and progress.
Day 13: Text or call someone just to say you appreciate them.
Day 14: End the week with a gratitude meditation – focus on abundance.
Week 3: Deepening the Practice Here, the focus shifts to internal growth and self-compassion.
Day 15: Reflect on three personal strengths you’re grateful for.
Day 16: Appreciate a mistake – acknowledge the lessons learned.
Day 17: Find gratitude in a difficult situation by reframing it.
Day 18: Write about a skill or talent you’re proud of.
Day 19: Thank yourself – write a letter of appreciation to yourself.
Day 20: Practice gratitude for the present moment.
Day 21: Journal about how gratitude is impacting your mindset.
Week 4: Spreading Gratitude Gratitude grows when shared with others.
Day 22: Surprise someone with a small gift or gesture.
Day 23: Offer words of encouragement to a stranger or colleague.
Day 24: Reflect on the people who’ve shaped your life.
Day 25: Share your gratitude practice with friends or family.
Day 26: Volunteer or contribute to a cause.
Day 27: Express appreciation for your job or professional growth.
Day 28: Write down 10 things you’re grateful for right now.
Final Days: Cementing the Habit
Day 29: Create a gratitude jar – add a note each day moving forward.
Day 30: Reflect on the journey and write a letter to your future self.
The Results
By the end of the 30 days, you may notice a shift – not just in how you see the world, but in how you feel. Life’s imperfections won’t vanish, but your resilience and ability to find joy in the small things will strengthen. Gratitude becomes more than a habit – it’s a way of living that enriches every aspect of your life.
So why not start today? One moment of gratitude could lead to a lifetime of abundance.
I used to think morning stretches were only necessary for athletes or fitness enthusiasts. But after months of waking up feeling stiff and sluggish, I decided to give it a try—and the results were life-changing. Stretching in the morning doesn’t just loosen tight muscles; it also improves circulation, boosts energy, and sets the tone for a productive day. Whether you’re easing into a workout or simply want to feel more limber, there are a few stretches you should do every morning to kick-start your body and mind.
Morning stretches are particularly effective because your muscles are at their tightest after hours of inactivity. Taking just 5-10 minutes to stretch can make a world of difference in how your body feels throughout the day.
Here are five must-try stretches that are simple, quick, and effective.
1. Cat-Cow Stretch
This gentle flow between two yoga poses helps awaken your spine and improve flexibility. Start on your hands and knees, alternating between arching your back (Cow) and rounding it upward (Cat). This movement relieves neck and lower back tension, making it one of the best stretches you should do every morning.
2. Standing Forward Fold
Stand tall, then hinge at your hips to fold forward, letting your arms dangle toward the ground. This stretch targets your hamstrings, calves, and lower back. It’s perfect for relieving stiffness and encouraging blood flow to the upper body. It might not be easy on your first try but put in some effort and with consistency, you will see results.
3. Side Body Stretch
While standing or sitting, raise one arm overhead and lean to the opposite side. Hold for 20-30 seconds, then switch sides. This simple stretch lengthens your obliques and helps you feel taller and more aligned—ideal for counteracting the compression caused by sleeping in one position.
4. Seated Spinal Twist
Sit cross-legged or on the edge of your bed, place one hand on your opposite knee, and twist gently to look over your shoulder. This movement improves spinal mobility and supports a healthy back. A seated spinal twist is a perfect addition to the stretches you should do every morning, especially if you spend long hours sitting during the day.
5. Downward Dog
This classic yoga pose stretches your shoulders, hamstrings, and calves while strengthening your core. Push your hips up and back from a plank position to create an inverted “V” shape. Hold the pose for 30 seconds to feel a full-body stretch and increased circulation.
Why These Stretches Work
Each stretch targets common tightness areas, such as the lower back, hamstrings, and shoulders. Regularly incorporating them into your morning routine reduces stiffness, enhances your range of motion, and prepares your body for the day ahead.
Final Thoughts
Adding these stretches you should do every morning to your routine is a small but impactful habit. The physical and mental benefits are undeniable—you’ll feel more relaxed, energized, and ready to tackle whatever comes your way. So, tomorrow morning, take a few minutes to try these stretches. Your body will thank you!
Intermittent fasting has become one of the most popular approaches to weight management and overall health improvement. Among its various methods, the intermittent fasting meal plan 16:8 stands out as a simple yet effective strategy that fits seamlessly into busy lifestyles. This blog explores what the 16:8 method entails, its benefits, and how to structure your meals during the eating window for optimal results.
What Is the Intermittent Fasting Meal Plan 16:8?
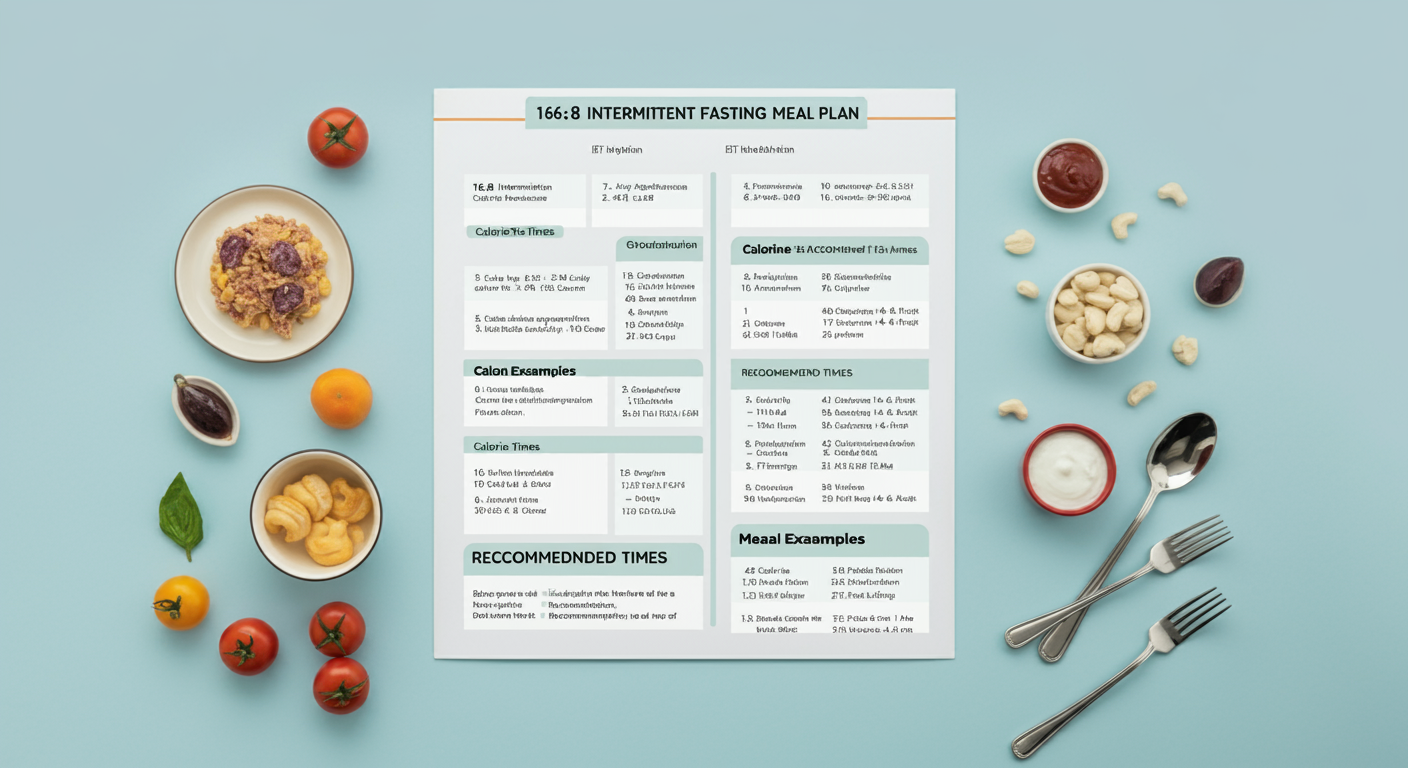
The 16:8 intermittent fasting method involves fasting for 16 hours each day and limiting your food consumption to an 8-hour window. Unlike traditional diets, it doesn’t restrict what you eat but rather when you eat, making it easier for many people to adopt.
During the 16-hour fasting period, you abstain from consuming calories. However, water, black coffee, herbal teas, and other non-caloric beverages are allowed. Once the fasting period ends, you have 8 hours to consume your daily meals and snacks.
For example, if you choose to eat between 12 PM and 8 PM, you’ll fast from 8 PM to 12 PM the following day.
Benefits of the 16:8 Method
The intermittent fasting meal plan 16:8 has gained traction due to its numerous potential benefits:
Weight Loss: By reducing the hours you eat, this method naturally encourages a calorie deficit, aiding in weight loss.
Improved Metabolic Health: Studies suggest intermittent fasting can help stabilize blood sugar levels, reduce insulin resistance, and promote fat burning.
Simplicity: With no complicated rules or calorie counting required, this plan is straightforward and easy to follow.
Enhanced Focus and Energy: Many individuals report increased mental clarity during fasting periods.
To maximize the benefits of the 16:8 plan, it’s essential to focus on nutrient-dense foods during your eating window. Here’s a sample intermittent fasting meal plan 16:8 to guide you:
12 PM – First Meal (Break the Fast)
A balanced meal with protein, healthy fats, and complex carbohydrates.
Example: Grilled chicken breast, a quinoa salad with avocado, and a side of steamed broccoli.
3 PM – Snack
A light snack to keep you satiated until dinner.
Example: Greek yogurt with fresh berries and a sprinkle of chia seeds.
7 PM – Dinner
Another nutrient-rich meal to round out your daily intake.
Example: Baked salmon with roasted sweet potatoes and a side of sautéed spinach.
During your eating window, it’s crucial to stay hydrated and avoid processed or high-sugar foods, as these can negate the health benefits of fasting.
Tips for Success
Start Gradually: If you’re new to fasting, ease into the 16:8 plan by gradually increasing your fasting period over a few days.
Stay Consistent: Consistency is key for seeing results. Stick to your chosen eating and fasting windows daily.
Listen to Your Body: If you’re feeling overly hungry or fatigued, adjust your meal sizes or consult a healthcare professional.
While the intermittent fasting meal plan 16:8 works for many people, it’s not a one-size-fits-all solution. Pregnant women, individuals with certain medical conditions, or those with a history of eating disorders should consult a healthcare provider before starting any fasting regimen.
Final Thoughts
The intermittent fasting meal plan 16:8 is a sustainable and effective way to improve your health, shed excess weight, and simplify your eating habits. By focusing on whole, nutrient-dense foods during your eating window and staying hydrated throughout the day, you can unlock the full potential of this popular fasting method.
If you’re ready to embrace a healthier lifestyle, why not give the 16:8 plan a try? You might just find it’s the perfect fit for your wellness journey.
Top 10 Anti-Inflammatory Foods to Add to Your Diet
I’ll be honest—there was a time when I didn’t pay much attention to how the foods I ate could impact my body beyond basic nutrition. It wasn’t until I started feeling sluggish and dealing with chronic inflammation symptoms, like joint pain and fatigue, that I began to explore the connection between diet and inflammation. What I found was both empowering and transformative: certain anti-inflammatory foods can work wonders for overall health. Whether you’re managing inflammation due to a specific condition or simply looking to feel your best, adding these foods to your diet can make a big difference.
Inflammation is a natural response by your immune system to protect against injury or infection. However, chronic inflammation can lead to health issues, including heart disease, arthritis, and autoimmune disorders. The good news? Anti-inflammatory foods are not only nutritious but also delicious, offering a proactive way to fight inflammation naturally.
Salmon, mackerel, and sardines are rich in omega-3 fatty acids, which reduce inflammation at the cellular level. Regularly consuming these fish has been linked to lower levels of inflammatory markers like C-reactive protein (CRP).
2. Leafy Greens
Spinach, kale, and Swiss chard are packed with antioxidants, vitamins, and anti-inflammatory compounds like polyphenols. These leafy greens are versatile and can be added to salads, smoothies, or sautéed dishes.
3. Berries
Blueberries, strawberries, and blackberries are small but mighty when it comes to fighting inflammation. Their anthocyanins, a type of antioxidant, help lower inflammatory responses while also protecting against oxidative stress.
4. Turmeric
This golden spice contains curcumin, a compound renowned for its potent anti-inflammatory properties. Adding turmeric to teas, curries, or even smoothies is an easy way to incorporate it into your diet.
5. Nuts
Almonds and walnuts are excellent sources of healthy fats and antioxidants. Their anti-inflammatory benefits are particularly helpful for heart health. A handful a day can make a noticeable difference.
6. Olive Oil
A cornerstone of the Mediterranean diet, extra virgin olive oil is rich in monounsaturated fats and oleocanthal, which has effects similar to anti-inflammatory drugs. Use it as your primary cooking oil or drizzle it over salads.
Tomatoes are rich in lycopene, an antioxidant that reduces inflammation, especially in the lungs. Cooking tomatoes enhances their lycopene content, making tomato-based sauces or soups a great option.
8. Ginger
Ginger has been used for centuries in traditional medicine for its anti-inflammatory and digestive benefits. Add fresh ginger to tea, stir-fries, or juices to take advantage of its properties.
9. Green Tea
Known for its high levels of catechins, green tea is a powerful anti-inflammatory food. Drinking it regularly may help reduce the risk of chronic diseases and provide a calming ritual.
10. Dark Chocolate
Good news for chocolate lovers! Dark chocolate with a high cocoa content (70% or more) contains flavonoids that can reduce inflammation. A small square a day can satisfy your sweet tooth while offering health benefits.
Making Anti-Inflammatory Foods a Lifestyle
Incorporating these anti-inflammatory foods into your daily meals doesn’t have to be complicated. Start with simple swaps, like using olive oil instead of butter or snacking on a handful of nuts instead of chips. Combine foods for maximum benefit—for example, make a salmon salad with spinach and a turmeric dressing.
Remember, your diet is a powerful tool in reducing inflammation and promoting overall health. By prioritizing these foods, you’re taking an active role in improving your well-being—one meal at a time.